Detectron2 walkthrough (Windows)
New research starts with understanding, reproducing and verifying previous results in the literature. Detectron2 made the process easy for computer vision tasks.
This post contains the #installation, #demo and #training of detectron2 on windows.
update:
2020/07/08
- install pycocotools 2.0.1 from PyPi
- add File 5 and File 6
Installation
Learning detectron2 starts with installing.
Requirements
- Windows 10 with Python ≥ 3.6
- PyTorch ≥ 1.3 and corresponding torchvision
- CUDA ≥ 9.2
- Visual Studio 2013-2019
- (Optional) OpenCV, needed by demo and visualization
Step 0. Setup a conda environment with the right python version(optional but recommended)
REM "Create a conda environment named 'detectron2' with the latest version of Python 3.7.x"
conda create --name detectron2 python=3.7
REM "Activate the conda environment for 'detectron2'"
conda activate detectron2
Note: All required python package will be installed in this environment(so does detectron2 itself), make sure activate the environment by command conda activate detectron2 before you do anything with detectron2. Deactivate the environment by conda deactivate so you can go back to your previous working environment.
Step 1. Install Python COCO API(pycocotools 2.0.1)
The latest version of detectron2 requires pycocotools 2.0.1
Install it by pip install pycocotools>=2.0.1 for Linux
But for windows, you should first download pycocotools-2.0.1.tar.gz from PyPi.
Unzip it then edit pycocotools-2.0.1\setup.py:
replace extra_compile_args=['-Wno-cpp', '-Wno-unused-function', '-std=c99'], with extra_compile_args={'gcc': ['/Qstd=c99']},
Back to command prompt, install pycocotools to site-packages of current environment(detectron2):
cd pycocotools-2.0.1
python setup.py build_ext install
If it works, you should see the info Finished processing dependencies for pycocotools==2.0.1, then you can delete the cocoapi directory if you like:
cd ..
RMDIR /S pycocotools-2.0.1
Step 2. Install PyTorch and torchvision
Check your CUDA version first:
nvcc --version
It should be ≥ 9.2 (that is 9.2, 10.0 or 10.1), go to https://pytorch.org/get-started/locally/, select your CUDA version copy the command (e.g. for CUDA 10.1 it should be)
conda install pytorch torchvision cudatoolkit=10.1 -c pytorch
Step 3. Install Detectron2
Official version doesn't support windows currently. To build and use it successfully on windows, you should edit some files: File 1, File 2, File 3, File 4, File 5, File 6
This repository ivanpp/detectron2 contains the latest version of official detectron2 with windows patches mentioned above. So the easy way to do this is to clone and build it:
git clone https://github.com/ivanpp/detectron2.git
cd detectron2
pip install -e .
Or use the official version:
git clone https://github.com/facebookresearch/detectron2.git
Then edit the files mentioned above and build it:
cd detectron2
pip install -e .
Note: it may took a while to build all the .cu and .cpp files, be patient!
Step 4. Check the installation
Check the installation:
python -m detectron2.utils.collect_env
The result should like:
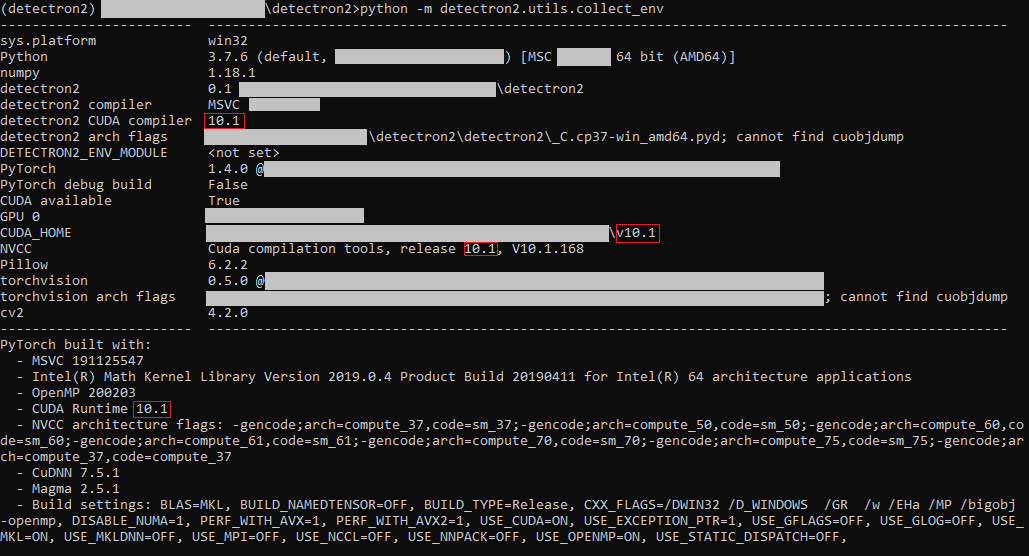
Make sure the NVCC version of detectron2 matches the NVCC version of PyTorch. If not, you may choose the wrong version at Step 2.
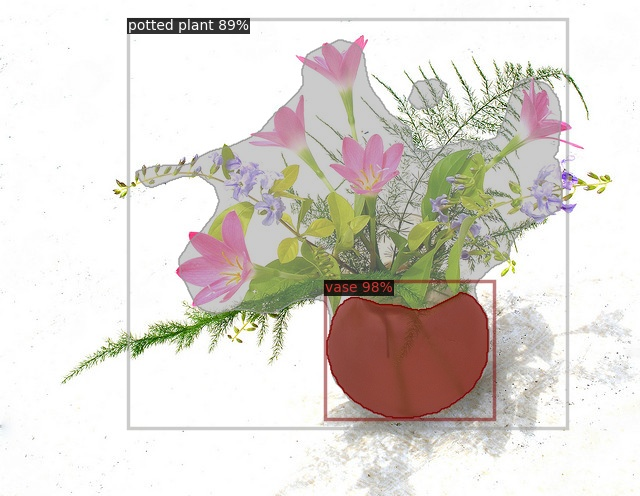
Run a pre-trained model
Choose a model in the model zoo, set the input config file and specify the corresponding MODEL.WEIGHT for it.
python demo/demo.py ^
	--config-file configs/COCO-InstanceSegmentation/mask_rcnn_R_50_FPN_1x.yaml ^
	--input datasets/coco/unlabeled2017/000000000361.jpg ^
	--output output.jpg ^
	--opts MODEL.WEIGHTS detectron2://COCO-InstanceSegmentation/mask_rcnn_R_50_FPN_1x/137260431/model_final_a54504.pkl
Note:
- "detectron2://" is equal to "https://dl.fbaipublicfiles.com/detectron2/" here, it will be resolve by
Detectron2Handle, see detectron2/detectron2/checkpoint/catalog.py for details. - Pre-trained weights from Internet will be cached to
%USERPROFILE%/.torch/fvcore_cacheif$FVCORE_CACHEenvironment variable is not set. (For Linux, the default cache file is~/.torch/fvcore_cache), see fvcore/fvcore/common/file_io.py for details. - If you don't want detectron2 to download and cache the model weight automatically. Specify the local path to the pre-trained weight after downloading it, like
--opts PATH/TO/model_final_a54504.pkl.
Reproduce the result
Training mask r-cnn model
All the config files are made for 8-GPU training. To reproduce the result on 1 GPU, there are changes to made. For example, to reproduce the result in configs/COCO-InstanceSegmentation/mask_rcnn_R_50_FPN_1x.yaml, you can edit the corresponding .yaml file(mask_rcnn_R_50_FPN_1x.yaml or Base-RCNN-FPN.yaml) or overwrite the training parameters in command line.
-
Inconvenient but once-for-all way:
-
Edit
configs\Base-RCNN-FPN.yaml:SOLVER: IMS_PER_BATCH: 2 BASE_LR: 0.0025 STEPS: (480000, 640000) MAX_ITER: 720000 -
Train the model:
python tools/train_net.py ^
	--config-file configs/COCO-InstanceSegmentation/mask_rcnn_R_50_FPN_1x.yaml ^
	OUTPUT_DIR output/mask_rcnn_r50_fpn_1x
-
-
Convenient way:
Simply overwrite it through command line, no need to edit any file:
python tools/train_net.py ^
	--config-file configs/COCO-InstanceSegmentation/mask_rcnn_R_50_FPN_1x.yaml ^
	SOLVER.IMS_PER_BATCH 2 SOLVER.BASE_LR 0.0025 ^
	SOLVER.MAX_ITER 720000 SOLVER.STEPS (480000,640000) ^
	OUTPUT_DIR output/mask_rcnn_r50_fpn_1x
All the checkpoints and the final model will be stored at the OUTPUT_DIR we defined, output/mask_rcnn_r50_fpn_1x, along with tensorflow eventlog file, log file... A comprehensive model config file will be generated automatically(output/mask_rcnn_r50_fpn_1x/config.yaml).
Resume training progress
Training progress may shut down sometimes, manually or accidentally. To resume training, simply run:
python tools/train_net.py ^
	--config-file output/mask_rcnn_r50_fpx_1x/config.yaml
	--resume
The training will be resumed from the last checkpoint automatically, no need to specify the checkpoint unless you need it for some reason.
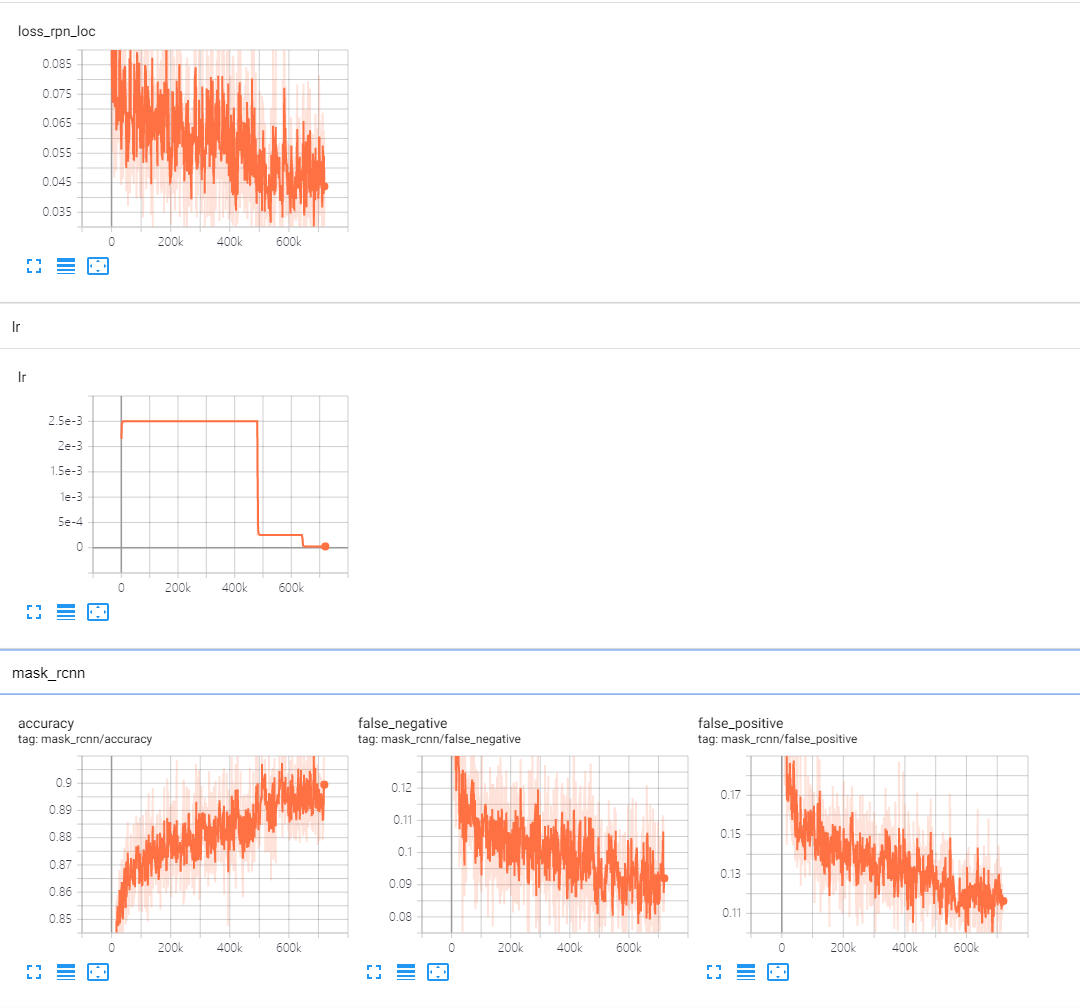
Visualize the training progress through TensorBoard
Use tensorboard to visualize the training progress during or after training:
tensorboard --logdir output
Evaluate the performance
Detectron2 will evaluate the final model after the training progress. To evaluate the performance of any checkpoint:
python tools/train_net.py ^
	--config-file configs/COCO-InstanceSegmentation/mask_rcnn_R_50_FPN_1x.yaml ^
	--eval-only MODEL.WEIGHTS /path/to/checkpoint_file